Step-by-step techniques that insulation pros use for blowing fiberglass or cellulose insulation into existing wall cavities

Insulation in house exterior walls is one of the primary defenses against heat and energy loss. Unfortunately, however, builders didn’t insulate the walls of most homes built before the 1980s. So if your house was built before insulating walls became a standard home building practice, you can potentially save a great deal of energy by insulating now. But how do you get insulation into existing walls without opening them up? That’s what we’ll discuss here.
Tools & materials for insulating existing walls
| Method | Tools Needed | Materials Needed |
| Insulating exterior walls from outside | Carpentry and siding removal tools, insulation blower and hoses | Sheathing and siding repair and touch-up materials |
| Insulating interior walls from inside | Large hole saw, insulation blower and hoses | Plastic tarps, drywall patching and finishing touch-up materials |
| All types | Stud finder, hole saw, safety goggles, respirator, heavy gloves, insulation blower and hoses | Loose-fill insulation, wall-repair materials |
If you’re not sure whether or not your home is insulated, please see the article Inspecting Home Insulation.
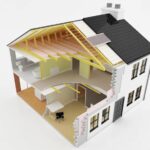
You can insulate existing exterior walls either from inside or outside the house. When doing it from outside, the job involves removing some siding panels so that large holes can be bored through the sheathing at the top of wall stud cavities.
Then installers use special equipment to blow fiberglass fibers or cellulose insulation through the holes into the cavities. (If you’re not familiar with terms such as “sheathing” and “wall studs,” please see House Framing Diagrams & Methods.) Then the walls are plugged up and the siding is replaced.
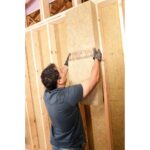
Blowing insulation into walls from inside the house basically involves the same procedures but, instead of removing siding, holes are cut through the drywall with a large hole saw. Of course, this creates a serious mess indoors and requires draping with plastic tarps for protection and extensive patching and painting of drywall. The following video gives you a pretty clear view of the mess and patching required.
Equipment for the job can be rented at many home improvement centers. In fact, some provide the equipment free if you buy about 20 bags of insulation. Always wear safety goggles and a mask or respirator when working with this material.
Shredded fiberglass and cellulose can be blown-in because their small particles fill in the nooks, crannies, and irregular areas of wall space quite well.
Blowing-In Insulation, Step-by-Step
1 Use a stud finder to locate studs in the wall. With a hole saw, cut a small hole (between 2 and 3 inches wide) between two studs and near the top of the wall, and place the cut portion aside—you will reattach this later. Repeat this step between each pair of studs.
2 Thread the blower hose into the first hole, and point the nozzle down deep into the wall cavity. Wrap a rag around the hose where it meets the wall to form a seal.
3 While you hold onto the hose, have a friend turn on the blower. Pull the hose back as the cavity fills. Ask your helper to stop the machine when you feel resistance and can no longer insert insulation.
4 Repeat steps 2 and 3, filling up the remaining wall cavities.
5 Once you have finished, reinsert the drywall cutouts and patch up and paint over the holes.
How to Insulate Existing Walls FAQs
- Can I insulate walls after they are already installed?
Yes, existing walls can be insulated without removing the surfaces, using blown-in cellulose methods or a professionally installed process called “injection foam.”
- Is it worth insulating existing walls?
Yes, insulating existing walls can significantly improve energy efficiency, reduce heating and cooling costs, and enhance indoor comfort. The EPA estimates that homeowners can save an average of 15% on heating and cooling costs by insulating walls.
- Can you insulate old walls?
Yes, old walls can be insulated, often requiring specialized techniques to preserve structural integrity while improving thermal performance.
- How do you insulate walls without removing them?
Walls can be insulated without removal by drilling small holes and blowing or injecting insulation material, like cellulose or foam, into the wall cavities. Then, all of the small entry holes need to be repaired.
- How can I insulate my walls cheaply?
For a cost-effective solution, consider using blown-in cellulose or fiberglass insulation, as they require minimal disruption and are relatively inexpensive. The least expensive way to insulate is to use fiberglass batts or blankets just after the walls are framed—before drywall is applied.
- What is the best insulation for interior walls?
Fiberglass, foam, and mineral wool are commonly recommended for interior walls, with the choice depending on factors like thermal performance, soundproofing needs, and budget. Fiberglass batts are far less expensive than various types of foam.