This comprehensive DIY guide on laying vinyl tile flooring includes how to prep your floor, layout considerations, and a step-by-step about how to lay floor tiles, including video.
One of the most popular kitchen and bathroom flooring materials is resilient tile, a surface that is highly water-repellent, moderately priced, slip-resistant, and easy to install. Tiles are uniform in size—the standard is 12 inches square—and fit together snugly without grout lines. They can be cut with a utility knife and a straightedge.
Some tiles have self-adhesive backs, but these tiles tend to be thinner, more limited in selection, and may not form as sure a bond as the types set with an adhesive compound.
Complete instructions for installing self-adhesive tiles are included with their purchase. The following directions are for installing the type applied with an adhesive. For step-by-step instructions, see Step-by-Step Resilient Floor Installation.
Preparing the Floor for Resilient Tiles
For a quality job, the substrate must be clean, flat, and very smooth. A plywood subfloor or an older vinyl floor that meets these requirements will serve. Before you begin, pry off the shoe molding along the base of walls; remove baseboards only if there isn’t any base shoe molding.
If you’ll be covering old resilient flooring, glue down any loose corners or edges. Smooth embossed flooring or any dips or bumps by troweling on an embossing leveler and then sanding it. If you’re tiling over a new concrete slab or where two subfloor materials meet, first cover the floor with a self-adhesive, anti-fracture membrane, which comes in 50-foot rolls. This will help prevent any new cracks in the concrete from being transmitted up through the tile.
If your floor is very irregular, think twice about removing it. Resilient flooring installed before 1986 may contain asbestos, which can be a serious health hazard if the fibers are released into the air.
Experts recommend removal by a specialist or covering the old floor with plywood underlayment made for this purpose before installing the new flooring. The edges of these panels interlock; if you must cut panels, run these along the walls.
Stagger corners so that four pieces don’t come together in one place. Note that plywood underlayment is marked with small crosses; drive a screw or pneumatically shoot a flooring staple at every cross mark. Set the heads of all fasteners below the surface.
Flooring Tile Layout Notes
You can walk on the tiles immediately after installing them, but you must not step on the adhesive, so do a dry run first. You can begin either at the center of the room or at one wall. Starting at the center is generally best, and necessary, if the room is out of square or if you’ve chosen tile with a pattern or design.
Establish perpendicular working lines (called “layout lines”) across the center of the floor so that they intersect at a right angle in the middle of the room. Start at a wall only if two adjacent walls meet at an exact 90-degree angle.
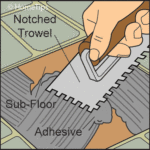
When you’re satisfied with your layout, read both the tile and adhesive manufacturers’ directions, paying particular attention to the time it takes the adhesive to dry. Apply adhesive evenly and sparingly with a notched trowel (see the adhesive directions for the proper notch size). Allow it to become translucent and tacky, but not dry, before installing the tiles.
Begin at the intersection of the two working lines and install tiles in the order shown, working toward the edges so that tiles around the border will be equal in size. Use soapy water or mineral spirits (depending on the type of adhesive) to clean up any excess as you work. Next, see Step-by-Step Resilient Floor Installation.
Here is a really well-done video that shows how to remove old vinyl tile and replace it with new luxury vinyl tile, step by step.
How to Lay Vinyl Floor Tiles
Installing a resilient tile floor is a relatively manageable job for do-it-yourselfers with moderate skills and tools. Here’s how to do it:
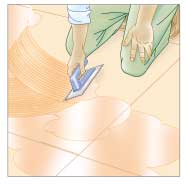
1 With a notched trowel held at a 45-degree angle, spread adhesive over the substrate using long, sweeping strokes that overlap by about 1 inch. Trowel away any excess immediately.
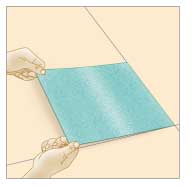
2 After waiting the proper amount of time, usually about half an hour, carefully position the first tile at the intersection of the working lines.
Be sure to get this one right because all the others will align to it.
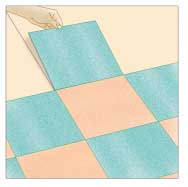
3 Continue installing tiles, aligning the edge of each with a working line or adjacent tile. Let the tiles fall into place (sliding them may force adhesive up between them).
Check alignment and make adjustments if necessary every couple of tiles. From time to time seat the tiles with a rolling pin or by walking on them.
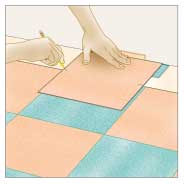
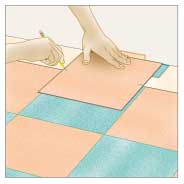
4 To figure out how much to cut off a border tile, turn it upside down in the correct direction over its future location and press it against a 1/4-inch spacer at the wall, making sure it does not touch the adhesive.
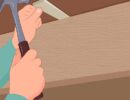
With a pencil, mark both edges for the cut. Score a single line with a straightedge between the two marks and then hold both sides of the tile firmly and bend it until it snaps.
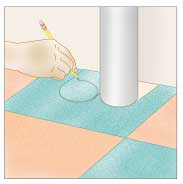
5 To fit tile around pipes or obstacles, cut a pattern from cardboard and then use a contour gauge or compass to transfer the pattern onto a tile.
To cut irregular shapes, use a sharp utility knife, scissors, or tin snips if the tile is pliable or can be made so by warming it with a hair dryer. If necessary, cut out a separate piece and glue it in place.
Caulk around pipes and cover with a flange.




 Don Vandervort writes or edits every article at HomeTips. Don has:
