How I improved the look of my home and protected my garage door from the elements—a personal project by home improvement expert Don Vandervort.
Because there is no gutter along the eaves above my sectional garage door, water spills down the door’s front and splashes up from the driveway.
This splashing water, along with my failure to follow the instructions when the door was first installed (I didn’t paint the inside of the door), peeled the paint and delaminated the lower section of the plywood-skin door. The result wasn’t the greatest-looking presentation for the front of the house.
I decided to refurbish the door but wanted to do something a little different. My garage door, like most, is a very large, flat surface. (Mine is a flush sectional roll-up model.) It is a very dominant-but uninteresting-part of the house’s facade. Rather than paint it a solid color, I wanted to give it a more interesting faux treatment-the type that is sometimes used indoors on walls. (I figured I could always cover a botched idea with another layer of paint.)
Unfortunately, before I could repaint the door, I had to replace the surface of the lower section, and to replace that, I had to remove the entire section. It sure would have been easier to paint both the outside and the inside of the door in the first place.
A garage door is extremely heavy. This type utilizes a torsion spring across the top to make it easier to lift. Working with a torsion spring is not a job for do-it-yourselfers because the spring is powerful and therefore very dangerous. With that in mind, I hired a garage door installer to handle this part. (In retrospect, it probably would have been only slightly more expensive to have the installer put in a new section.)
Once the tension was released from the spring, I clamped the upper sections in place and unscrewed the hinges and rollers from the section that needed removal. Then I lifted it out of its tracks. Replacing the veneer was just a matter of prying off the old material, sanding the frame, and gluing a new skin of matching 1/4-inch plywood veneer onto the frame with waterproof glue. (I cut this piece to size face up on my table saw, using a fine-toothed blade.) While I had the section down, I also primed the front and back surfaces.
Then I reassembled the door.
Again, I had to hire the garage door installer to rewind the torsion spring. While he did this, he told me a few horror stories of unsuspecting homeowners who had gravely injured themselves while trying to do this. Enough said.
Finally, I was ready to paint-or at least prepare to paint. At this point, I used a flat scraper to remove all of the loose paint and then followed up with a wire brush. (Be sure to wear safety glasses if you do this type of work.) Next, I used my orbital sander, fitted with a medium-grit paper, to smooth the surface. Using a putty knife, I applied vinyl spackling compound to voids and dents. After it dried, I sanded again with fine-grit sandpaper.
Following a dusting with a rag, it was time to prime the rest of the door. For best adhesion, I used an oil-alkyd primer. I rolled it onto the large, flat surfaces and then worked it in with a brush, being careful to paint the edges of the veneer and the areas between the sections.
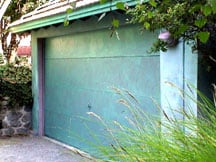
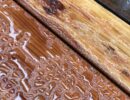
Now for the faux finish. I began by applying two coats of a deep gray acrylic latex paint. After allowing that to dry thoroughly, I rolled on a light, thinned coat of greenish, oil-alkyd-based paint. Before that dried, I used clean rags to swirl and blot away excess paint, creating a mottled effect. This process involved a bit of trial and error, but I quickly got the hang of it. The result was a multidimensional, frescoed appearance.
I’m happy to say that the first rains saw my garage door well protected and looking better than ever. Maybe one of my next projects had better be to run a gutter over the garage door.



 Don Vandervort writes or edits every article at HomeTips. Don has:
