Check with the building department in your area before you start planning a sprinkler system. Research any installation restrictions or codes that might affect the design, including regulations for backflow preventers and the sizes of valves and pipes you’re allowed to use.
You’ll also need to call your utility companies to determine if there are gas, water, telephone, or cable lines on your property that might be broken or disrupted by trenching for sprinklers. Mark the location of all underground utilities on your garden layout.
To begin planning your irrigation system, first locate the water supply, which is usually your home water source. Next, find the point where you’ll connect your system to that water supply pipe.
It’s important to check and note your home’s water pressure and the flow rate of the water supply pipe that will serve the sprinklers. Water pressure lower than 40 pounds per square inch limits the sprinkler heads you can install.
High water pressure can be a problem too: To prevent misting at the sprinkler nozzle, systems with between 80 and 100 psi may need pressure or flow regulation.
Draw a Layout Plan
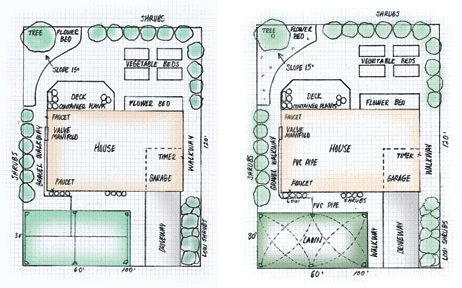
A carefully measured and scaled irrigation layout plan will help you make a complete shopping list before you head to the hardware store. Using a copy of your garden plan, mark where you intend to put sprinkler heads and note the areas they’ll cover. Then use a second plan to note where control valves and pipes will go.
The number of valves you use will affect the size of the manifold system you’ll need. Add up the total length of pipe, including an additional foot for every 20 feet to cover any small measuring errors.
Include elbows and crosses for corners and branches in each circuit. For each sprinkler head, add a threaded riser and any other fittings, such as a threaded tee or elbow, for each riser.
Don’t forget a backflow preventer for anti-siphon valves, plus a shutoff valve, pipe-thread tape, and PVC cement and primer for slip connections.
Sprinkler Head Patterns & Spacing
To figure out which types of sprinkler heads will work best in your yard, take another look at your garden plan.
Make copies—one for each area—so you will have plenty of space to write down the number, type, and location of each circuit’s sprinkler heads.
If you’re planning a combination sprinkler and drip system, plan the sprinklers first and then the drip system.
You have plenty of options when it comes to designing your sprinkler pattern since sprinkler heads come in such a wide range of throw distances and nozzles.
Begin planning out rectangular spaces, since irregular or curved areas are more of a challenge.
You want to use as few sprinkler heads as possible in each area while still maintaining good coverage. More sprinkler heads mean more circuits, which will increase the overall cost of installing your system.
Sprinkler heads should always be placed so that the sprays overlap—the distance one head throws should reach the head of the next sprinkler. This is called head-to-head coverage, and sprinklers should be placed equidistantly in each zone to achieve it.
Rectangular Areas
In rectangular spaces, start by placing sprinklers in the corners, adding more along the perimeter if necessary.
A 30-by-60-foot lawn, for instance, can use 30-foot rotors in each corner and in the middle of each long side.
For less easily divided dimensions, place a sprinkler head in the corners and work out the fewest number of heads for each long side based on how far the spray heads or rotors throw.
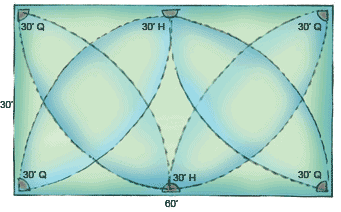
Put a sprinkler head in the middle of the lawn if the area is wider than the sprinkler heads can throw.
Irregular Areas
Odd-shaped areas require a little more fine-tuning. Use sprinkler heads that have adjustable-pattern nozzles; you may have to add a head with a different spray radius to fully cover the area.
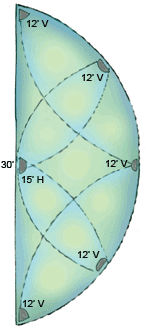
If you can’t eliminate overspray, reduce it as much as possible and make sure it won’t damage fences, your home’s siding, or other surfaces that shouldn’t be exposed to excessive moisture.
Narrow Strips & Spaces
Specialized nozzles that throw water in a rectangular pattern rather than in an arc can be used to water narrow strips of lawn.
A side-strip nozzle is used on the long end of a strip, a center-strip nozzle is placed in the middle, and a corner-strip nozzle in the corners. For a strip such as the one between the sidewalk and the street in front of many houses would only need one side strip and two corner strips.
Strip-pattern nozzles can cover areas 4 or 5 feet wide and up to 30 feet long.

Stake Sprinkler Locations
Installing sprinklers in an established landscape requires careful mapping and measuring.
Start by drawing an irrigation layout to scale, showing where you plan to place pipes; work around tree roots and hardscaping as much as possible. It’s not necessary to install the whole system at once—you can spread the work out over a few weekends, installing one circuit at a time.
Once your layout is complete, go out into your yard and mark sprinkler head locations with stakes or flags. “Connect” each sprinkler head with paint, chalk, or string wrapped around the stakes or flags to map out pipe locations, including the water supply pipe, control valve locations, and where you’ll need to dig a trench for the wiring between timers and valves.
To make sure your marked lines match your irrigation layout, go back and re-measure the distances between sprinkler heads. Sprinkler heads should be spaced correctly to water each area thoroughly but without wasting water.
Plotting Sprinkler Heads
Once you have determined the kinds of sprinkler heads you will need for your irrigation system, it’s time to sketch out their locations, as well as the locations of the pipes.
For the best results, each area of your landscaping should have its own irrigation circuit, and some areas might need more than one. For the most efficient use of water, make sure to use the same type of sprinkler head with the same output on each circuit—in other words, don’t use shrub heads and rotors on the same circuit.
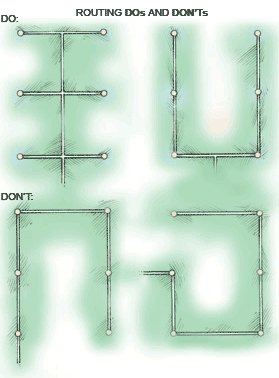
Keep your water source’s output in mind as you plan for the number of sprinkler heads. To ensure proper water pressure for each head, a circuit should not use more than 75 percent of the available water flow.
For example, if your faucet has a flow rate of 16 gallons per minute (gpm), a circuit should not use more than 12 gpm.
Look in the manufacturer’s instruction booklet to find the total output for a sprinkler head and then add the output of each head on the circuit to determine total output.
Write down the output of each sprinkler head next to its location on your irrigation layout, and then assign as many heads as you can to each circuit.
If you have a flow of 10 gpm at your faucet, for example, you could install 15 sprinklers that use .5 gpm each. If you find that you exceed the recommended flow rate for a circuit, switch some sprinkler heads to another circuit or divide the circuit into two.
After you have your sprinklers arranged on each circuit, you will need to lay out the pipes that connect each circuit to the water source. Start with pipe extending from the main water source to the control valves.
The layout of your pipes will determine the efficiency of each sprinkler head. Pipe that goes through the fewest number of sprinkler heads to reach the end sprinkler maintains the best water pressure and flow throughout the circuit.
Conversely, the more sprinkler heads water must run through in a circuit to reach the last one, the poorer the water pressure and flow will be.
When planning the layout of your pipes, avoid tree roots, driveways, and other paved surfaces. If you are laying pipe for a slope, lay as much horizontally as you can.




 Don Vandervort writes or edits every article at HomeTips. Don has:
