Expert DIY advice on how to fix a leaking faucet in the bathroom or kitchen, including how to stop faucet leaks and drips.
A leaky or dripping faucet is generally a sign that a part is worn and needs to be replaced. Fixing this is a fairly simple DIY task.
Here’s how to fix a leaky faucet
BRIEFLY:
- Turn off the water beneath the sink and drain the faucet by opening it.
- Disassemble the faucet by removing the handle screw and handle as discussed below.
- Pry or pull off the escutcheon or cap if it has one.
- Pull out the cartridge, threaded spindle, ball, or disc.
- Check seals, washers and O-rings and, if necessary, replace.
- Reassemble the faucet and turn on the water supply valve.
IN DEPTH: The exact repair for a water faucet depends upon which part of the faucet is dripping and, more importantly, the mechanical makeup of the faucet.
At the first sign of a drip, don’t torque down on a faucet in an effort to stop the drip—in most cases this will just damage the faucet. Instead, replace the washers or seals that are failing to stop the flow of water through the faucet. If you have an older faucet that is chronically leaky, consider replacing the entire faucet with a new, high-quality model. For more, see Faucets Buying Guide.
There are four main types of faucets, based on their internal mechanisms:
- Compression
- Disc
- Cartridge
- Ball
Before you can fix a dripping faucet, you’ll need to determine what type it is. You’ll find much more about all of these below.
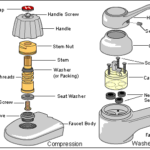
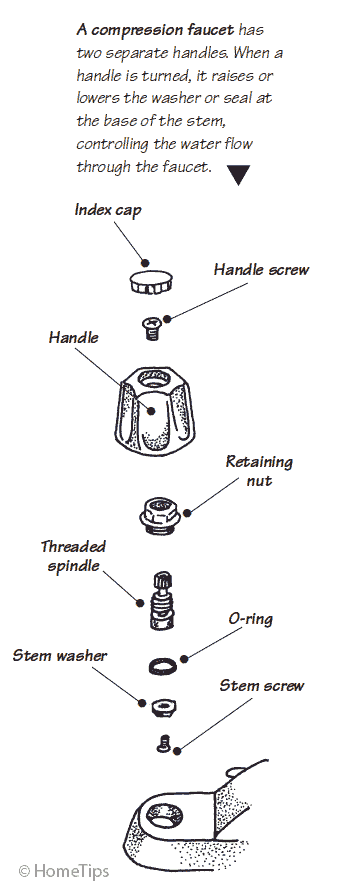
Compression faucets are the oldest type. Faucets that have two controls—one hot and one cold—are typically compression faucets. Compression faucets are the type most likely to drip. With constant usage, the washers or seals of compression faucets are repeatedly torqued down against the metal valve seats, so they eventually wear out. When they do, the result is relentless dripping that can corrode fixtures, stain sink bowls, and waste a lot of water if they are not fixed.
Ball, disc, or cartridge faucets have a single handle that controls both hot and cold. Called “washerless faucets,” they are more expensive than compression faucets but offer better control and reliably last longer. Because they don’t utilize the same types of compression washers, they are far less prone to drip from the spout. However, they do have moving parts sealed by O-rings that wear out. DIY replacement is easy with these.
If you don’t have a manual with the manufacturer’s specifications (and you can’t find one searching on the Internet), the best way to tell which kind of faucet you have is to disassemble it. However, before you take it apart, turn off the water supply valves beneath the sink!
- Turn off the hot water supply valve first.
- Check the faucet for the drip.
- If the drip stopped, work on the hot-water side of the faucet.
- If the faucet is still dripping, turn the valve back on and turn off the cold water supply valve.
- Check for the drip again. If it has stopped, work on the cold-water side of the faucet.
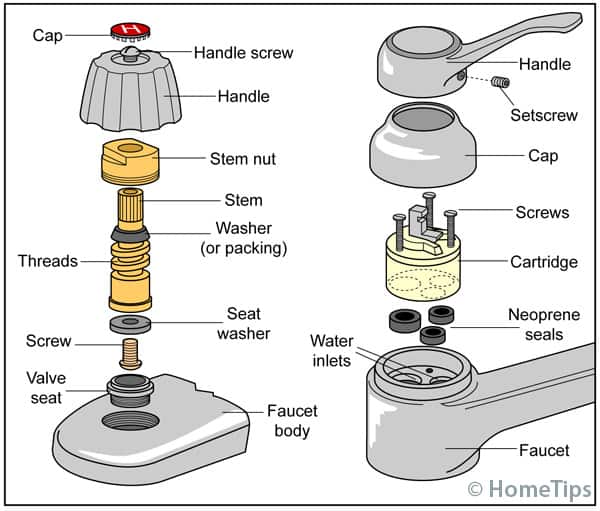
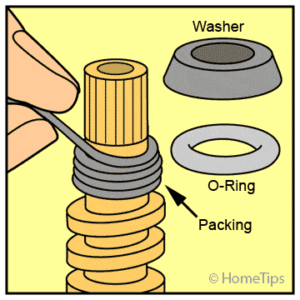
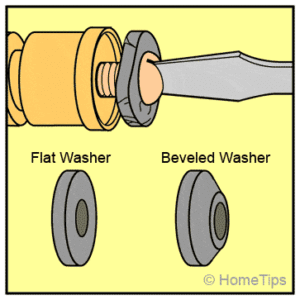
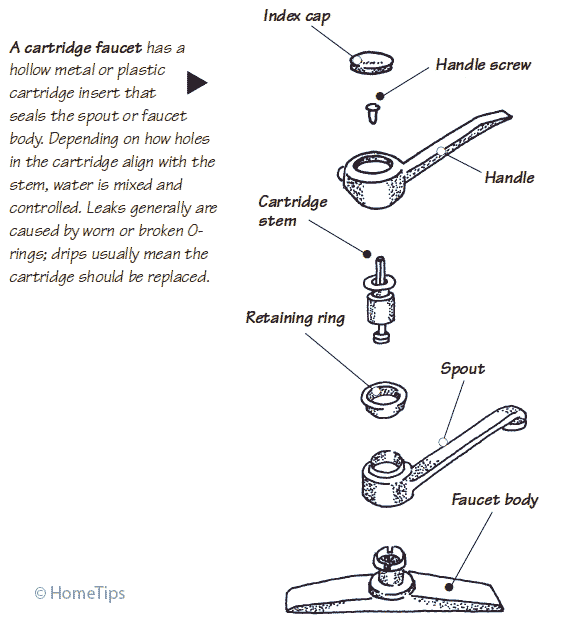
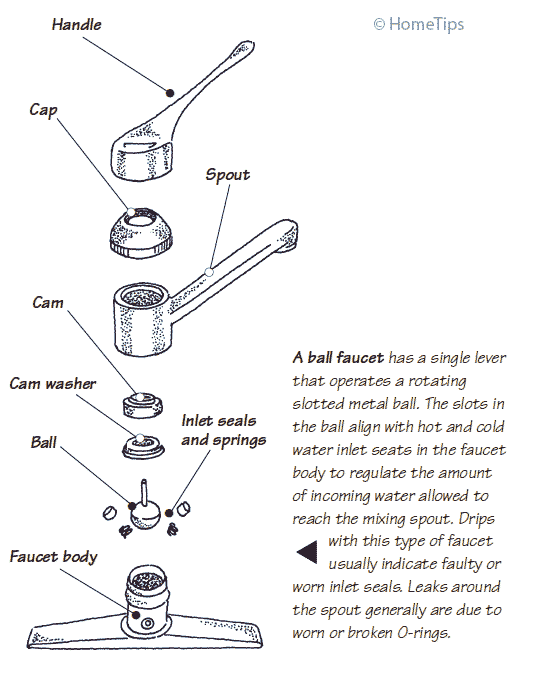
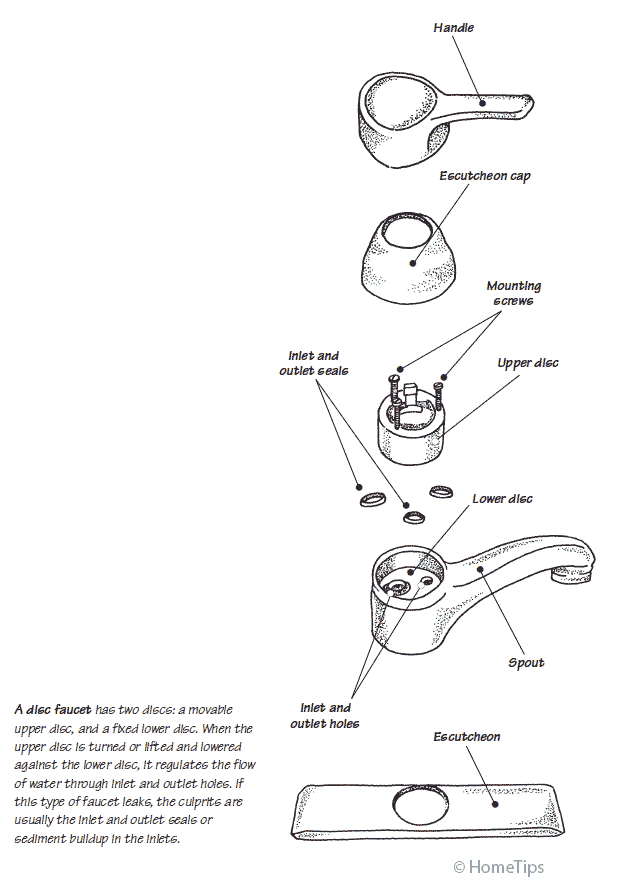
When fixing a leaky faucet, refer to the illustrations here for the locations of washers, seals, and O-rings. Faucet drips and leaks nearly always mean these parts need replacement.
Faucet drips and usually happen because of failed washers or seals. To replace them, you must disassemble the faucet.
Again, before you disassemble a faucet, turn off the water supplies beneath the sink!
Lay rags in the sink to protect the sink from tools and to prevent small parts from dropping into the drain.
Leaks around the handle usually mean that the O-rings on the stem need to be replaced or that the packing nut or adjusting ring needs to be tightened. To do this you normally just remove the handle.
Compression Faucet Repairs
If a compression faucet leaks from the handle, tighten the packing nut or replace the packing, which may be a washer, an O-ring, or twine wound around the compression stem.
If water drips from the spout, you’ll need to replace a washer or a corroded valve seat. Turn off the shutoff valve for that fixture, take off the faucet handle, remove the stem, and replace the worn washer with one that is the same size. While you’re at it, take this opportunity to lubricate the threads of the stem with silicone grease.
If you have these kinds of faucets, it pays to have on hand an inexpensive faucet repair kit, which is essentially a little box of assorted washers and O-rings.
Cartridge Faucet Repairs
Most bath faucets sold today are cartridge faucets, as are many kitchen faucets.
Cartridge faucets leak when the O-ring cushioning the cartridge stem wears out or breaks.
A drip indicates that the cartridge needs replacing.
You can buy replacements at plumbing supply retailers, home improvement centers, and some hardware stores.
In certain cases, they may need to be special ordered. Be sure the replacement matches the original.
For a cartridge faucet that drips, you may only need to replace an O-ring, seat, and spring—inexpensive parts that are easy to change out. This video shows the process:
If that doesn’t do the job, you can change the entire cartridge.
This video does a great job showing how to replace the entire cartridge in a typical cartridge faucet.
Ball Faucet Repairs
Ball faucets, such as those made by Delta and Price Pfister, drip when the inlet seals wear out and leak when the O-rings wear out or break.
If the handle leaks, tighten the adjusting ring after lifting the handle off the assembly.
If the handle continues to leak, replace the cap. If the spout drips, the inlet seals and springs or the ball need replacing.
This video does a good job of showing you how to replace those parts on a ball-style kitchen faucet:
Here you can see the process of replacing parts on ball-style bathroom faucet:
Disc Faucet Repairs
Disc faucets leak when the inlet and outlet seals wear out or when sediment builds up in the faucet inlets.
Disc assemblies don’t often wear out, but sometimes the inlet and outlet seals fail.
Turn off the shutoff valve and replace the worn seals with duplicates.
Be sure to realign the seals on the bottom of the cartridge with the holes in the faucet.
Reduced Water Flow
If water is not flowing strongly through your faucet, one of several causes may be responsible.
First, check the aerator if the faucet has one. This device, typically screwed onto the end of some kitchen faucets, mixes air and water. Because it’s basically a small screen, it can become blocked with mineral build-up. Unscrew the aerator and clean it with hot water and an old toothbrush or toothpick. And then replace it.
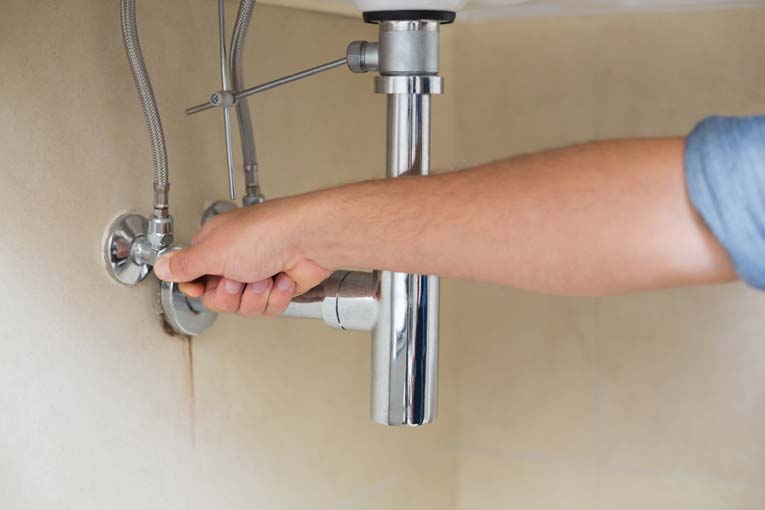
If that doesn’t do the trick, check the supply valves under the sink—be sure they’re fully open. If a supply valve is partially closed, open it by turning it counterclockwise.
If these measures don’t work, shut off the water to the faucet and disassemble the faucet as discussed above to check for debris or a dislodged faucet washer.
One other possibility is mineral build-up in the water supply tubes or angle-stop valves that supply the faucet, under the sink. If this is the case, the valves or supply tubes will need to be replaced.




 Don Vandervort writes or edits every article at HomeTips. Don has:

