This DIY guide will teach you how to clean and replace resilient flooring, a way to keep your flooring looking its best.
Resilient floors are very sturdy. Even so, they can become scratched, stained, or gouged, and they may develop bumps, bubbles, or curled edges. Although most have surfaces protected by a wear layer, heavy foot traffic or the constant movement of furniture can cause wear patterns. Keeping resilient floors clean saves them from damage by ground-in dirt particles, which wear away the surface over time.
Colors and patterns can also fade if the sun shines directly on them for too long, which makes them a poor choice for areas of the house that may receive a lot of sun. In addition to this, moisture can cause sheet vinyl to work loose around the edges of a room. Rooms with floors at or below grade level often have moisture problems as a result of poor drainage outside. If this is the case in your home, you’ll have to solve the moisture problem before repairing the flooring; otherwise, the problem will recur.
With resilient tile floors, it’s usually easier to replace a damaged tile than try to repair the floor (but only if you can find a matching replacement). With sheet flooring, repair may be the only practical option. You can probably handle minor repairs; for difficult jobs, contact a resilient floor installer.
How to Clean a Resilient Floor
Most new vinyl and similar resilient flooring materials have “no-wax” coatings that stay glossy with just basic cleaning. Resilient floors that don’t have these types of coatings require more maintenance.
Recommendations for basic cleaning vary by manufacturer, but a typical procedure for a no-wax resilient floor is to sweep and mop with a pH-neutral liquid floor cleaner—the best products are available through flooring retailers. Follow by using a sponge to rinse with clear, clean, warm water and allow to dry (or speed up drying by wiping with a clean towel).
If you have a resilient floor that does not have a no-wax finish, you will probably have to strip, clean, and re-wax it to get it looking glossy again. This is a big job that requires 1) buying a quality wax stripper from a janitorial supply, 2) clearing the floor area of furniture and obstacles, 3) applying the stripping solution to sections of the floor with a mop, 4) scraping up the old wax with a squeegee, putty knives, rags, and scrubbing pads, 5) mopping up each completed section with clear water, and then 6) applying a new coat of liquid wax.
Spilled liquids and food should be wiped up immediately before the stains become harder to remove. A clean cloth dipped in pH-neutral liquid floor cleaner is often the best bet. Scrub balky stains with a nylon pad, but be careful not to abrade the floor’s surface. Don’t use abrasive cleaners or mechanical buffers on high-gloss floors—this will weaken the protective coating.
Repairing Curled Floor Tiles
Minor surface problems such as lifted corners can be fixed easily, but check first that they don’t indicate problems with the subfloor. Before you try to repair or replace damaged sections of resilient flooring, you’ll need to determine the cause of the damage and correct it. Then you can either touch up the surface to conceal the flaws or patch or replace the damaged area. If you must replace flooring, match materials and adhesives. As always, when installing a new floor, save some material or tiles for future repairs.
When tiles begin to curl, they most often need to be replaced. First find out if your flooring or its adhesive contains asbestos, known to cause cancer if inhaled. Consult an expert to determine if this is the case. Asbestos-control experts often recommend encapsulation rather than removal (meaning you apply another layer of flooring over the top).
Once you have determined that your flooring is asbestos-free, you can reaffix a tile that’s lifted at one corner in a few quick steps.
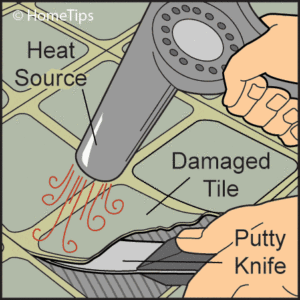
Warm the tile that has begun to curl with a hair dryer, iron, or propane torch (be careful!), focusing the heat on the lifting corner.
Peel up the corner or, if possible, the entire tile, using a putty knife. Scrape off the old adhesive.
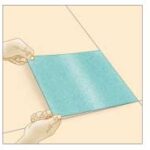
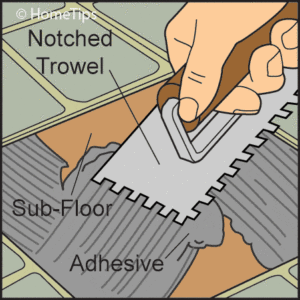
Using a notched spreader or trowel, spread resilient tile adhesive on the subfloor and push the tile firmly into it.
Wipe away any excess adhesive.
Separated Vinyl Floor Seams
When the seams of vinyl sheet flooring separate and pucker, you can glue them back down with a vinyl flooring sealer kit. Generic types are available online and at home improvement stores; better, order kits made specifically for your type of flooring (if you know the brand) from a flooring dealer.
1. Use a hair dryer to warm the edges of the raised seam so you can peel them back to work on them.
2. Brush and/or vacuum the dirt out from the subfloor beneath the seam area.
3. With masking tape, protect the flooring surfaces on both sides of the seam.
4. Use a brush to apply multi-purpose sheet flooring adhesive to the back of the raised flooring.
5. Press the edges down and wipe off any excess adhesive. Then put a heavy, flat board along the seam and add weight with phone books or other heavy objects. Allow to dry overnight.
6. Use the seam-sealing kit as prescribed on the label to clean and permanently fuse the seam along the surface.
Discolored Vinyl Floor
Vinyl and most other types of resilient flooring don’t need to be protected by waxing, but many floor care products include wax to brighten the shine. When wax builds up, it begins to discolor.
Discoloration that results from wax buildup is easily remedied. Use a solution of white vinegar and water or a vinyl floor wax cleaner specifically formulated for your type of flooring. Mop the solution onto the surface with a sponge mop and then rinse with clear water.
Scratched or Blistered Vinyl Floor
Scratches that don’t penetrate through resilient flooring often can be sanded out (sanding creates fine airborne dust, which may be hazardous if the flooring contains asbestos so have a sample of your floor tested first).
If you do sand, use a medium-grit sandpaper followed by finer grits until the scratch disappears. Apply floor wax to restore the shine on the buffed area.
Blisters in sheet vinyl can be reglued. Make a knife cut along the edge of the blister, just large enough to let you work glue into the void. Use an artist’s brush to apply contact cement on both the subflooring and the blister flap.
Let the glue dry until tacky and then lay the flap down and place a weight on the repaired area for several hours.
Bumpy Resilient Flooring
Bumps that appear on the surface of a floor covering material are usually the result of nails or screws beneath the material that have loosened and raised. If there are bumps showing through the flooring from your subfloor, place a block of wood over the bumps and tap lightly with a hammer.
If this doesn’t work, the bumps will be difficult to get rid of and you’ll have to remove the floor covering to gain access to the subfloor so you can replace the nails or screws.
Replacing Resilient Floor Tiles
When you replace resilient flooring tiles, use the adhesive the manufacturer specifies.
If your flooring is old, you may need to take a sample to a flooring materials supplier and ask what kind of adhesive is recommended. Also be sure you know what kind of subfloor you have. It may be that you cannot find a matching tile to make a repair.
Consider using a complementary or even contrasting color or design. To replace a damaged tile, warm the tile with a hair dryer, iron, or propane torch until it begins to lift up. With the help of a putty knife, peel the tile up and scrape off the old adhesive and replace the tile as discussed above under Repairing a Curled Floor Tile.
To replace tiles over a concrete slab with residual adhesive, first try to remove most of the old adhesive with a heat gun and a scraper. Then use a latex-modified thinset over the mastic.




 Don Vandervort writes or edits every article at HomeTips. Don has:
