Expert advice on how to complete a garage makeover efficiently. Follow these tips about the planning phase, coloring, insulating the space, and more.
Traditionally one of the most overlooked of spaces, today’s garages now provide a wealth of multifunctional opportunities for the family. The days of the garage used merely to house vehicles, seasonal decorations, work benches, and tools have made way for fashion-forward designs that attractively maximize storage, as well as allow for usable hobby and play areas enjoyed by adults and children alike.
For information on how to make your garage “smarter” with a variety of high-tech devices, see How to Make Your Garage Smarter.
Planning a Garage Makeover
The process of creating an effective garage design begins with a thoughtful plan. Paint and color provide simple tools that assist homeowners in achieving a customized garage.
“Bump-out” areas on the side of a garage may be designed to incorporate storage and work areas and are increasingly popular options found in newly designed and remodeled homes. As most people employ garages for various types of storage, a wide variety of shelving and cabinets provides ways of maximizing space.
Plywood, slat-board, or specially designed organizing systems are effective options that can be handsomely painted.
Color In the Garage
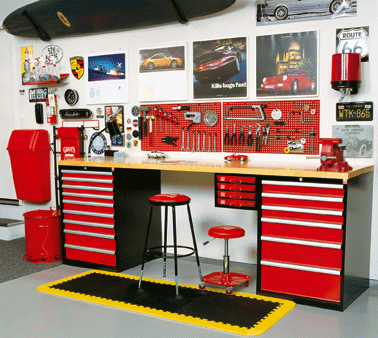
Cabinetry can be customized with an attractive paint color scheme to delineate storage for specific items. Upper cabinets may be painted one color and lower cabinets another color within the palette. Introduce a third color from the desired scheme into the mix by using it to highlight cabinet drawer fronts.
A fourth color can be implemented on the interior back wall of the cabinets. Painting the inside of cabinet drawers using different hues within the color scheme provides assistance with the organization of small, hard-to-find items. Even the most inexpensive and insignificant wall hooks can be easily painted enticing colors within the scheme. (©PQI)
Insulate a Garage Living Area
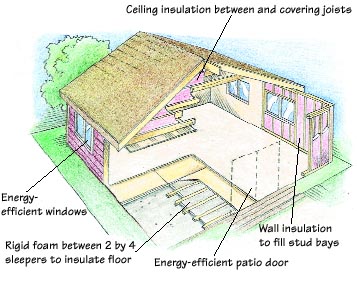
A garage converted to living space needs the same level of insulation in the ceiling, walls, and floor as the top floor of your house.
To supplement insulation already installed in the garage, you can blow cellulose into the walls.
Insulate the floor with rigid foam boards, as you would a basement floor.
Unless your garage is under your house, it needs the same level of ceiling insulation as the top floor of your house. Adding insulation to the ceiling, like adding it to the ceiling of an attic, is a job that may well require the services of a pro.
Buying Garage Lighting & Garage Flooring
Because today’s garages have become important extensions of our living spaces, an active industry has emerged to produce a wide range of amenities, from garage lighting to floor coverings and much more. For information on a variety of high-tech gadgets that can help make your garage “smarter,” see How to Make Your Garage Smarter.
Garage Lighting
Your garage, like any other utility room in your house, deserves good lighting. The type or types of fixtures you choose will largely depend on how and how often you use your garage.
Fluorescent lights are a good option for lighting a workbench beneath a cabinet or shelf because they’re the most energy efficient and burn cooler than incandescents. Since they’re relatively compact, they won’t infringe on valuable workspace, and many are designed to clip together to create a continuous strip.
Incandescents, which include halogen lights and xenon bulbs, provide more focused lighting than fluorescents and are best for detailed projects. Halogens produce the brightest, most focused light but also generate the most heat. Use low-voltage versions with built-in transformers to light areas under cabinets without raising the temperature. Xenon bulbs last longer and provide the same focused light as halogens without the heat.
Garage lighting used to consist almost entirely of overhead fixtures that utilized incandescent bulbs or fluorescent tubes. Today, the options for lighting work and storage areas in your garage are as varied as those for the home. Your choices will largely depend on how you’re using a given area.
Task lights. The beauty of garage task lighting is that it brings focused light to your work area. Before installing task lights, however, consider which way shadows will be cast and how comfortable you’ll be while working-the light shouldn’t shine in your eyes or block your view of the work surface.
Clamp-on lights. Lights that clamp on to your work surface allow you to adjust lighting for individual projects. If you’re working on something especially detailed, try using a magnifying lens attached to the light.
Under-cabinet light fixtures. To illuminate areas under cabinets and shelves, you’ll need to choose between fluorescent and incandescent lights, depending on the nature of the work you plan on doing.
Buying Garage Lighting Fixtures
Lighting from incandescent bulbs is more than sufficient if your garage is only used to house your cars and store infrequently used items. Incandescents come on immediately, use very little energy with infrequent use, and will not flicker like some cheap fluorescents no matter how cold the temperature.
However, if you have set up your garage as a workshop or other kind of activity center, high-quality fluorescents are your best bet. For several reasons, fixtures with T8 tubes (T stands for “tubular” and the number refers to how many eighths of an inch are in the diameter-in the case of a T8,1 inch) and electronic ballasts are worth the extra expense over a standard fixture that holds T12 bulbs and has magnetic ballasts.
- The T8 sheds about the same amount of light as a T12 but is 32 percent more energy efficient.
- Colors under T8s look closer to the real thing.
- T8s with electronic ballasts keep the bulbs from flickering and humming down to degrees as low as 0 degrees F. This is in stark contrast to T12s, which fail to operate correctly below 60 degrees F.
- Most T8s come with rapid-start ballasts as opposed to instant-start ballasts, which tend to burn bulbs out prematurely when lights are frequently turned off and on.
When purchasing fixtures, look for ones that take 4-foot tubes. They are not only less expensive and easier to handle but also last longer and save more energy than 8-foot tubes. When installing the fixtures, placing one every 4 feet will provide more even illumination than placing two every 8 feet. Once you have decided on a fixture or fixtures, you need to choose the bulbs. The two qualities to consider are the ambience factor and the color rendering quotient.
The ambiance factor-whether the light shed from a bulb or tube appears warm or cool-is determined by its color temperature, measured in degrees on the Kelvin scale. The higher the degree, the cooler the light. If your garage is used for little more than housing cars, neutral light (3500K) is perfectly acceptable. However, if your garage is used as any sort of entertainment area, you probably would do better with warm light (3000K). Cool light (4100K) works better for an office or an activity that is detail oriented. Look for color temperature ratings on the packaging.
The color rendering quotient-how “true” colors appear under a certain light-is expressed as a bulb or tube’s CRI-color rendition index. On a scale of 0 to 100, most people find that colors look true at 85 and above, with 100 representing how a color looks in natural sunlight. T8s score right at 85 (T12s rank in the 60s), and the only lightbulbs that reach 100 are halogen incandescents. A high CRI rating is most desirable if you are trying to match a wood stain, for instance, or if you use your garage as an artist’s atelier.
Garage Flooring
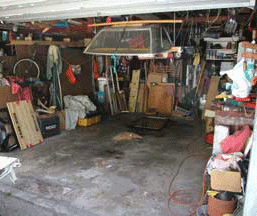
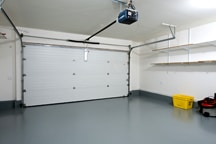
If you want to create a pleasant, clean garage environment, start by finishing the floor. Most residential garage floors are unfinished concrete, which accumulates dirt and stains, is difficult to sweep clean, and kicks up dust whenever you walk or work on it.
Garage flooring options all have their pros and cons. They range from just adequate to incredibly high end, and as you might imagine their cost varies accordingly.
If you choose any type of garage floor paint, sealer, or epoxy, proper preparation is an absolute must-including cleaning and etching the concrete surface with muriatic acid.
Planning a Garage Workshop or Crafts Area
If you are passionate about a hobby, but space in your house is at a premium, with efficient planning you can transform a portion of your garage into a workshop or crafts center.
Workshop
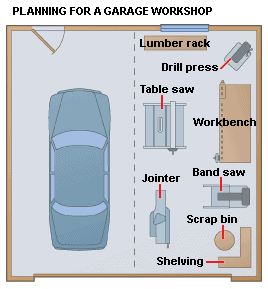
The illustration below shows a typical schematic for a woodworking shop—should you have the luxury of co-opting half of your two-car garage to accommodate it.
If you don’t have that much available space, you can make tools and even workbenches mobile by placing them on locking casters or on wheeled bases made from a layer or two of plywood 3/4 inch thick. When you are done working for the day, you can simply roll everything to an out-of-the-way location.
Crafts center
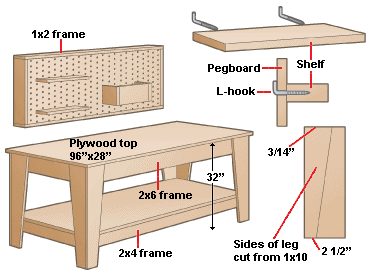
Pursuing most any craft is more enjoyable if there are spacious work surfaces and generous storage for supplies and materials. The crafts bench shown above is a sturdy table made from a top frame of 2 by 6s and a bottom frame of 2 by 4s attached to plywood legs.
The table top is plywood, but depending on the nature of the craft, you may want to consider attaching a layer of plastic laminate on top to protect it from staining,
The storage unit shown is made from 1 by 4s with 1/4-inch pegboard inserted into the finished frame. Peg hooks inserted into the pegboard can accept hanging items; shelves for storing larger items and containers for storing smaller items can be hung on the pegboard using L-hooks to support them.
For information on specialty garage flooring products, see Garage Floor Paints & Finishes and Garage Floor Grids & Mats.






 Don Vandervort writes or edits every article at HomeTips. Don has:
